为jekyll网站添加algolia搜索功能
目录
1.为 jekyll 添加简单的本地搜索功能
如果只是想要拥有一个简单的搜索功能,建议使用simple-jekyll-search这个插件。这个插件可以本地运行,可以搜索标题、标签、时间、网址。Github 上虽然也提供了全文搜索的选项,但我没有成功,也不推荐使用,因为可能会导致性能问题。
简单的配置如下:
第一,在根目录新建一个名为 search.json 的文件,内容如下:
---
layout: none
---
[
  {% for post in site.posts %}
    {
      "title"    : "{{ post.title | escape }}",
      "category" : "{{ post.category }}",
      "tags"     : "{{ post.tags | join: ', ' }}",
      "url"      : "{{ site.baseurl }}{{ post.url }}",
      "date"     : "{{ post.date }}",
      "excerpt"  : "{{ post.excerpt }}"

    } {% unless forloop.last %},{% endunless %}
  {% endfor %}
]
第二,在根目录新建 search.md 文件,内容如下:
---
layout: default
title: 搜索
permalink: /search/
---

<!-- HTML elements for search -->
<input
  type="text"
  id="search-input"
  placeholder="搜索:标题、标签、时间、摘要"
  style="
    transition: box-shadow .4s ease,background .4s ease,-webkit-box-shadow .4s ease;
    display: inline-block;
    margin: 0 12px 12px 0;
    background: #f5f5f500;
    border: 1px solid rgba(0, 0, 0, 0.15);
    border-radius: 6px;
    box-shadow: 0 10px 30px rgba(0, 0, 0, 0.15);
    transition: all 0.23s ease-in-out 0s;
    line-height: 1.7;
    color: #202020;
    max-width: 100%;
    margin-bottom: 15px;
    padding: 0.5rem 0.75rem;
    font-size: 1rem;
    line-height: 1.7;
    width: 325px;
    "
/>

<ul id="results-container"></ul>

<!-- script pointing to jekyll-search.js -->

<script src="https://unpkg.com/simple-jekyll-search@1.10.0/dest/simple-jekyll-search.min.js"></script>

<script>
  SimpleJekyllSearch({
    searchInput: document.getElementById("search-input"),
    resultsContainer: document.getElementById("results-container"),
    json: "/search.json",
    searchResultTemplate: '<li><a href="{url}" title="{desc}">{title}</a></li>',
    noResultsText: "没有搜索到文章",
    limit: 20,
    fuzzy: false,
  });
</script>
此时,访问your_domain_name/search/,就能看到搜索页面了。
可以将这个页面添加到导航。在_includes 中新建一个 navigation.html 文件,在其中添加内容:
<nav>
  <a class="navi" href="/">主页</a>
  <a class="navi" href="/about/">关于</a>
  <a class="navi" href="/tags/">标签</a>
  <a class="navi" href="/archive/">归档</a>
  <a class="navi" href="/search/">搜索</a>
</nav>
请注意,最后一项导航项才是我们要添加的,其他的项目是通常会有的,如果它们与你的代码冲突或无关,请忽略它们。
以下为演示效果:

2.在 Netlify 上使用 Algolia
假设你在 Netlify 上部署了一个网站,由于两者有密切的合作,你会更方便使用 Algolia。
先按照官方文档操作。
当你到达这一步的时候,如下图所示,请注意,Algolia 所给的代码片段对新手很不友好,因为缺少一个 HTML 选择器,以至于只把这段代码粘贴到我们的模版文件中是不会显示的。

在原有代码的最上方添加选择器代码:
<div id="search"></div>
并将如下全部代码复制到你想显示 Algolia 的搜索框的任何网页的模版之中。
<div id="search"></div>

<link
  rel="stylesheet"
  href="https://cdn.jsdelivr.net/npm/@algolia/algoliasearch-netlify-frontend@1/dist/algoliasearchNetlify.css"
/>
<script
  type="text/javascript"
  src="https://cdn.jsdelivr.net/npm/@algolia/algoliasearch-netlify-frontend@1/dist/algoliasearchNetlify.js"
></script>
<script type="text/javascript">
  algoliasearchNetlify({
    appId: "JF08G8WUNK", //替换为你的数据
    apiKey: "b113a01ae9d39bb783055a5d4b01b701", //Search-Only API Key 替换为你的数据
    siteId: "0c6e6f1e-28a4-44fd-bf45-60e7113c4fb5", // 替换为你的数据
    branch: "master",
    selector: "div#search",
    placeholder: "Explore the site...", //搜索框的占位符
    detached: false, //移动视图下,搜索不使用分离模式
    hitsPerPage: 10, //默认返回10个结果
  });
</script>
假设你想在你的 archive 模版中显示,则将其放置在最顶端。假设你想使之单独成页,请在根目录新建 search.md 文件,将这段代码粘贴进去,并按照之前的方法为之添加导航。
注意,其中的 apikey 是你的 Search-Only API Key。
其效果如下:

3.在 Vercel 上使用 Algolia
假如你像上面那样使用 Netlify 创建了一个网站,且安装了 Algolia 的插件,则你将自动获得 Algolia 的一个免费 Application,其配额为 20K 请求与 20K 记录。我建议你使用这个 Application再创建一个 index,以使 Vercel 上的网站享用这个配额。它比不通过 Netlify 申请的多一倍。
你只需要在 Netlifty 上随便创建一个网站,并在安装完 Algolia 的插件后,不再管它。回到 Vercel,假设你想为运行在 Vercel 上的 Jekyll 添加搜索,你需要调价 Jekyll-algolia 插件。这个插件与 Netlify 的不同,其显示效果也不同,看你喜欢哪个了。喜欢 Netlify 的,则可以满足于上一节的操作。
因为在 Netlify 比 Vercel 的访问速度稍微慢些,特别是内地,所以我选择了 Vercel。
先从 Algolia 的官方文档开始。
3.1 配置 Gemfile
假设你的 Jekyll 网站本来运行良好,你需要在你的 Gemfile 文件的末尾添加如下内容:
source 'https://rubygems.org'

gem 'jekyll', '~> 3.6'

group :jekyll_plugins do
  gem 'jekyll-algolia'
end
请注意,如果你的 Gemfile 中本来就有group :jekyll_plugins do的片段,请将gem 'jekyll-algolia'添加进去即可。
假如你的你的 Gemfile 中本来没有group :jekyll_plugins do的片段,你需要在末尾完整条件以上代码。
比如我的 Gemfile 中的内容原本是:
# frozen_string_literal: true

source "https://rubygems.org"
gemspec
gem "jekyll-feed"
gem "jekyll-paginate"
gem "jekyll-redirect-from"
gem "jekyll-seo-tag"
gem "jekyll-sitemap"
gem "jekyll-tagging"
gem "jekyll-tagging-related_posts"
gem "kramdown-parser-gfm"

gem 'jekyll', '~> 3.6'
我一开始只是把gem 'jekyll-algolia'添加到这段代码中,导致不起效。gem 'jekyll-algolia'必须在group :jekyll_plugins do的片段中。而且,为了这样做,你无需改动本来工作良好的其他代码。
3.2 配置_config.yml
添加如下代码:
# _config.yml

algolia:
  application_id: your_application_id
  index_name: jekyll # 你自己在algolia中创建的index
  search_only_api_key: your_search_only_api_key
3.3 配置 Algolia 前端
在_includes 文件夹中新建 algolia.html 文件,添加以下内容:
<script src="https://cdn.jsdelivr.net/npm/instantsearch.js@2.10.5/dist/instantsearch.min.js"></script>
<script src="https://cdn.jsdelivr.net/npm/moment@2.24.0/moment.min.js"></script>
<link
  rel="stylesheet"
  type="text/css"
  href="https://cdn.jsdelivr.net/npm/instantsearch.js@2.10.5/dist/instantsearch.min.css"
/>
<link
  rel="stylesheet"
  type="text/css"
  href="https://cdn.jsdelivr.net/npm/instantsearch.js@2.10.5/dist/instantsearch-theme-algolia.min.css"
/>
<script>
  const search = instantsearch({
    appId: "{{ site.algolia.application_id }}",
    apiKey: "{{ site.algolia.search_only_api_key }}",
    indexName: "{{ site.algolia.index_name }}",
    routing: true,
    searchFunction(helper) {
      const container = document.querySelector("#search-hits");
      container.style.display = helper.state.query === "" ? "none" : "";

      helper.search();
    },
  });

  const hitTemplate = function (hit) {
    let date = "";
    if (hit.date) {
      date = moment.unix(hit.date).format("Y-M-D");
    }

    let url = `{{ site.baseurl }}${hit.url}#${hit.anchor}`;

    const title = hit._highlightResult.title.value;

    let breadcrumbs = "";
    if (hit._highlightResult.headings) {
      breadcrumbs = hit._highlightResult.headings
        .map(match => {
          return `<span class="post-breadcrumb">${match.value}</span>`;
        })
        .join(" > ");
    }

    const content = hit._highlightResult.html.value;

    return `
    <div class="post-item">
      <span class="post-meta">${date}</span>
      <h2><a class="post-link" href="${url}">${title}</a></h2>
      {{#breadcrumbs}}<a href="${url}" class="post-breadcrumbs">${breadcrumbs}</a>{{/breadcrumbs}}
      <div class="post-snippet">${content}</div>
    </div>
  `;
  };

  search.addWidget(
    instantsearch.widgets.searchBox({
      container: "#search-searchbar",
      placeholder: "Search into posts...",
      poweredBy: true, // This is required if you're on the free Community plan
    }),
  );

  search.addWidget(
    instantsearch.widgets.hits({
      container: "#search-hits",
      templates: {
        item: hitTemplate,
      },
    }),
  );

  search.start();
</script>

<style>
  .ais-search-box {
    max-width: 100%;
    margin-bottom: 15px;
    font-size: 1em;
    box-shadow: 0 10px 30px rgba(0, 0, 0, 0.15);
    border-radius: 6px;
  }
  .post-item {
    margin-bottom: 30px;
  }
  .post-link .ais-Highlight {
    color: #2a7ae2;
    font-style: normal;
  }
  .post-breadcrumbs {
    color: #424242;
    display: block;
  }
  .post-breadcrumb {
    font-weight: bold;
    font-size: 18px;
    color: #424242;
  }
  .post-breadcrumb .ais-Highlight {
    font-weight: bold;
    font-style: normal;
    color: #2a7ae2;
  }
  .post-snippet .ais-Highlight {
    font-style: normal;
    background: yellow;
  }
  .post-snippet img {
    display: none;
  }
  .ais-search-box--input {
    transition:
      box-shadow 0.4s ease,
      background 0.4s ease,
      -webkit-box-shadow 0.4s ease;
    display: inline-block;
    margin: 0 12px 12px 0;
    background: #f5f5f500;
    border: 1px solid rgba(0, 0, 0, 0.15);
    border-radius: 6px;
    box-shadow: 0 10px 30px rgba(0, 0, 0, 0.15);
    transition: all 0.23s ease-in-out 0s;
    line-height: 1.7;
    color: #202020;
  }
</style>
你可以自行修改某些样式。
3.4 引入 Algolia 搜索部件
方法同简单本地搜索类似,在根目录新建 search.md 文件,添加如下内容:
<div id="search-searchbar"></div>

<div class="post-list" id="search-hits"></div>
{% include algolia.html %}
当然,你可以将以上代码放置在任何你想要要展现搜索的模版文件中,比如在 archive.html 或 tags.html 中。不必单独成页。
3.5 在本地运行测试
执行以下代码:
ALGOLIA_API_KEY='your_admin_api_key' bundle exec jekyll algolia
假设你本来在本地运行良好,你将看到成功生成和上传 index 的提示官方文档的效果:

假设你本来就没有本地运行过,你可能需要想办法成功运行,因为这似乎为在 Vercel 上使用 Algolia 所必须。
通常,如果你不使用任何像 Algolia 这类插件,你完全可以在 Vercel 部署你来自 Github 仓库的网站,在你提交数据后,Vercel 会自动给你建构并发布,并不需要 Github 建构,后者只需要存储代码。
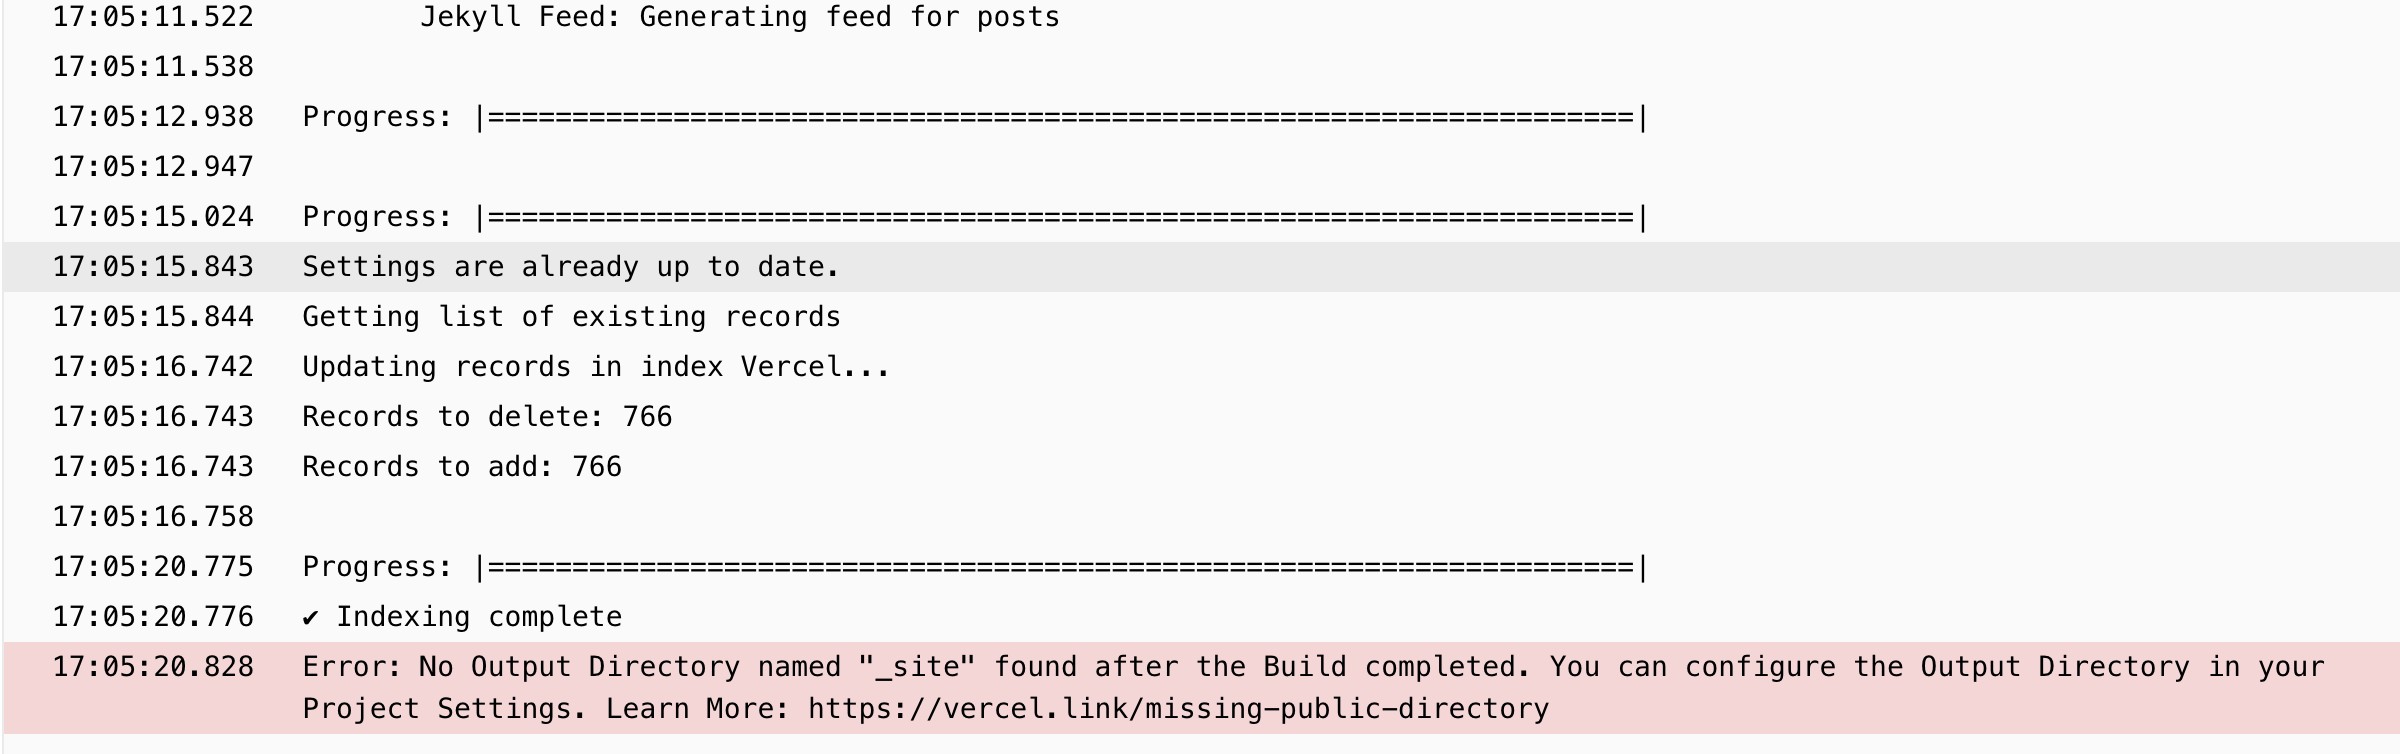
但是,现在为了使用 Algolia,你需要至少上传一次_site 文件夹,否则就会出现如下错误提示,而这就需要本地运行 jekyll,以生成_site 文件夹。
3.6 在 Vercel 上配置
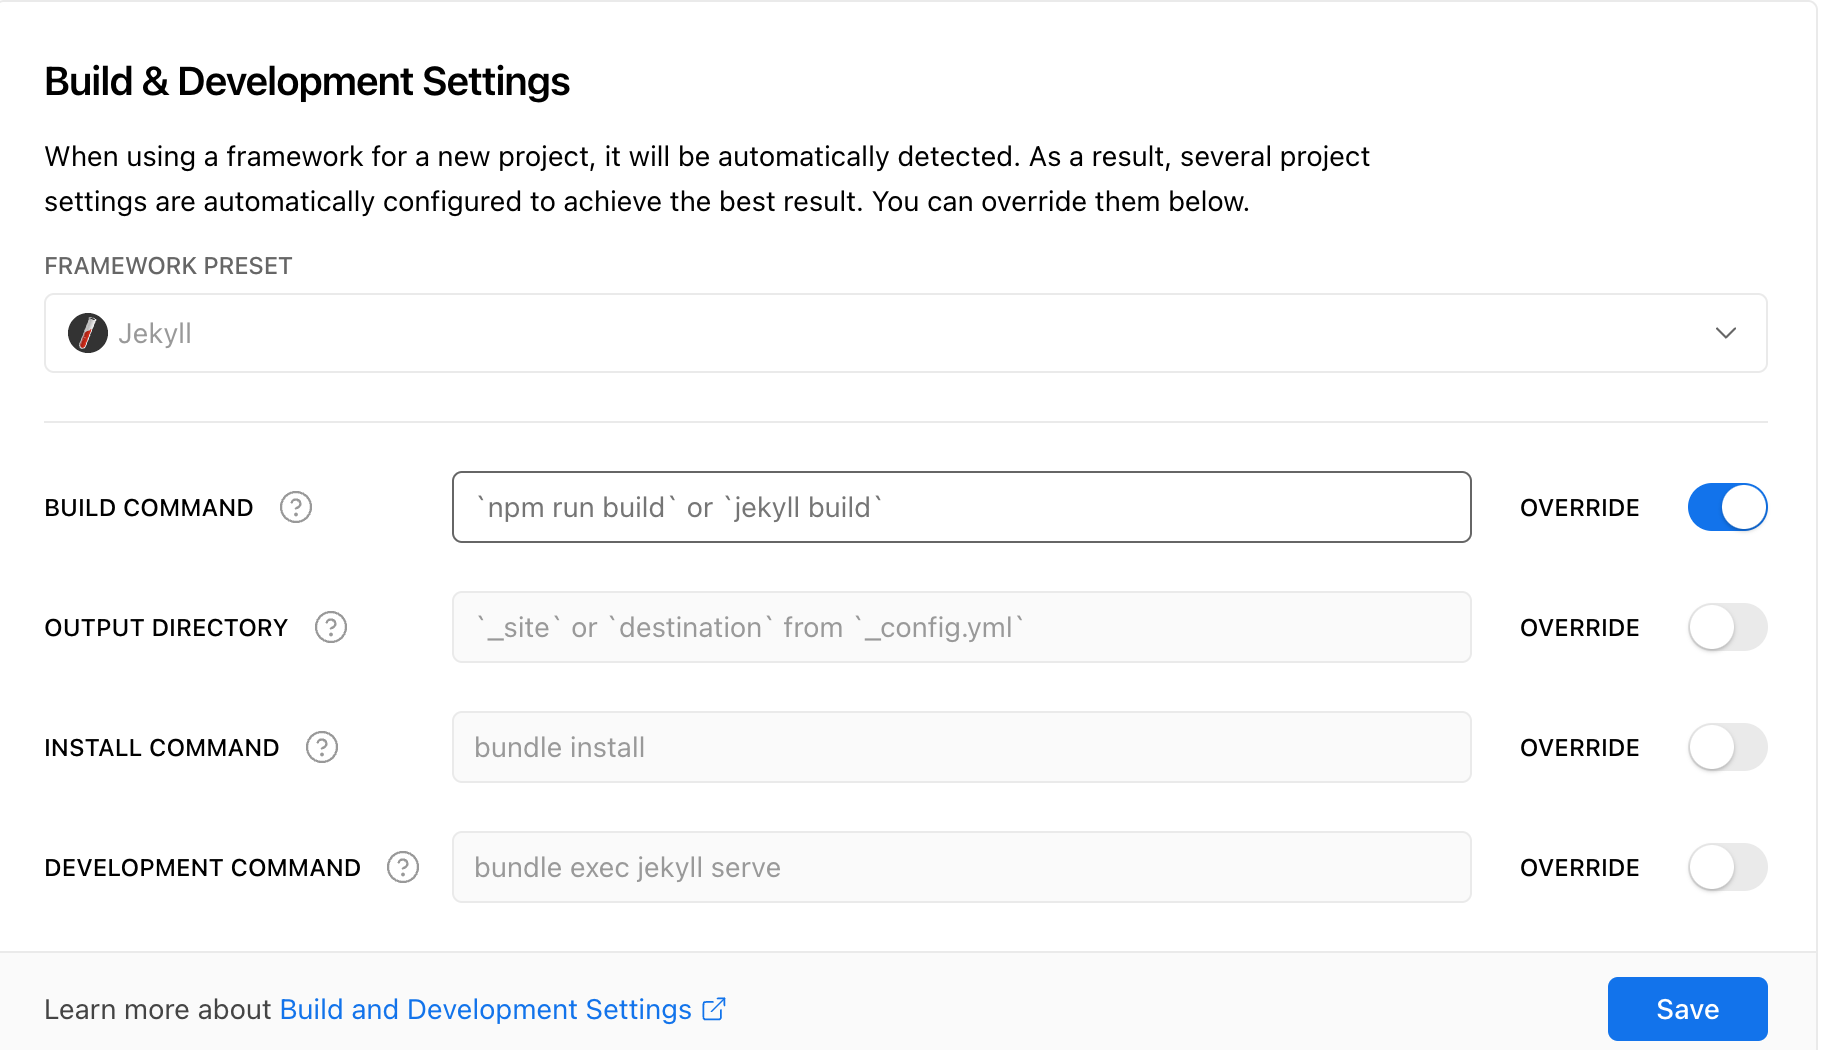
假设你在本地成功运行 Jekyll。现在请提交一次代码,这将把你在本地构建的网页传送到 Vercel。Vercel 如果成功建构,则继续在 Vercel 上的配置。在 build command 选项中填入如下命令:
jekyll build & ALGOLIA_API_KEY='your_admin_api' jekyll algolia
这段代码与 Algolia 官方文档建议的不同,增加了jekyll build &;若不增加,每次提交代码,Vercel 每次只向 Algolia 推送记录,而不建构新的代码,导致网站的输出网页会一直是你上一次本地运行后提交的。
这是关键的一步。你当然也可以一直使用本地运行,不再使用 Vercel 的建构功能。
如何判断配置好 Vercel 的 build 命令,正常运行呢?
- 改动你的某个 post,推送数据,等待 Vercel 建构结果;
- 查看网页是否发生了该变动;
- 如果有,则运行良好,此时可以删除_site 文件夹内的所有数据(不包括该文件夹);
- 如果没有,则需要继续排查;
- 如果始终失败,你可以选择每次本地运行,然后推送给 Vercel 的方法。
至此,如果顺利,你应该成功在自己部署于 Vercel 上的 Jekyll 网站上用上了 Algolia。
其效果如下:

4.资源
Yanxi Chen 有一个可以使用全文本地搜索的改进版本。
可以尝试他的博客的模板。
也可以尝试我自己整理好的,可直接使用Algolia 的 jekyll 模板。